Personalized attention +34 96 206 62 98
 Free shipping to Iberian Peninsula from 30€
 9/10 Rating
 Discreet shipping
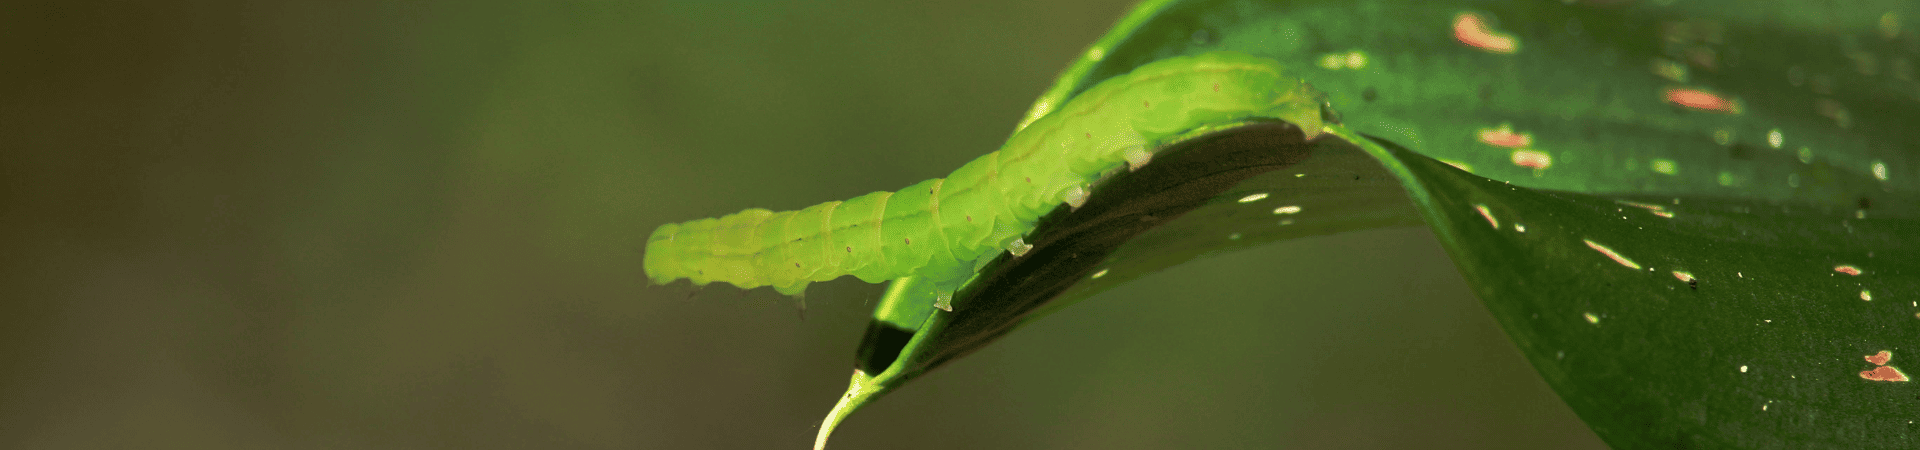
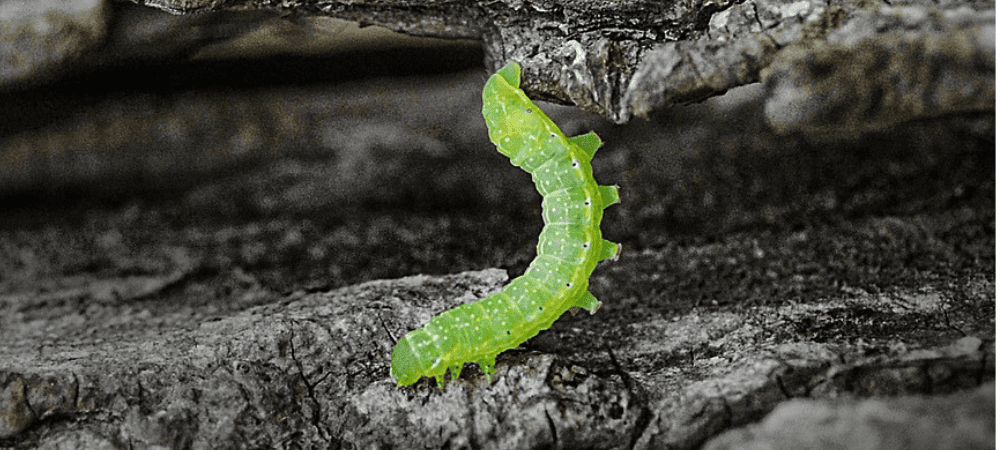
If you’ve seen chewed leaves, irregular holes, or small dark debris on your plant, it’s very likely you’re dealing with a green worm infestation. Although many people generically call them green worms, in most cases they are larvae or caterpillars. Green worms on cannabis plants feed on leaves and tender shoots. But if the infestation progresses, the green worm can reach the flowers or buds.
The problem with green worm infestations on plants is that they often go unnoticed at first due to their color, which camouflages very well with the foliage. By the time you realize it, the green worm may have damaged part of the young tissue, weakening the plant.
In this GB The Green Brand guide, you will discover what the green worm is and why green worms appear on cannabis plants. You will also learn how to distinguish the green worm from other pests and what its effects are.
Keep reading this post to discover home remedies to eliminate green worms on cannabis plants!
What is the green worm?
When we talk about ‘green worm’, we are not referring to a single, specific species. Green worm infestations on plants are usually butterfly or moth larvae. However, sometimes the damage can be very aggressive.
These green worm larvae appear when the adult insect lays eggs on leaves, shoots, or protected areas of the plant. After hatching, the green worm larvae feed on the plants. Initially, during the early stages, they cause minor damage to the plant. But as they grow, they consume more tissue, leaving more visible debris.
Why do green worms appear on cannabis plants?
The green worm appears more frequently in outdoor crops. In fact, there is a caterpillar season in cannabis, which is when it is hottest. The green worm can also appear during periods of high butterfly and moth activity. But why? Several factors favor the appearance of green worms on plants:
- Green worms on plants due to excess plant mass: A very bushy plant makes inspection difficult and creates natural refuges where green worm larvae go unnoticed.
- Poor ventilation: Enclosed or poorly ventilated areas make it easier for green worm infestations to persist longer without being detected.
- Lack of inspection of the underside of leaves: Many egg layings and many young green worms spend their first days in less visible areas.
- Attractive environment for moths or butterflies: Night lights, gardens with abundant vegetation, and periods of high activity increase the risk of green worm infestations on plants.
- Insufficient prevention: When the crop is not checked frequently, the window to act in time against a green worm infestation is greatly reduced.
How to tell if you have a green worm infestation on your cannabis plants
Although the damage may initially resemble that of other pests, there are certain clues that assure you the green worm is behind it.
If you have green worms on your plants, you will find the following damage in your cannabis crop:
- Small or irregular holes in the leaves: The damage from young green worm larvae is usually more discreet, leaving only small perforations. As green worms grow, the holes become larger and more irregular. In some cases, green worms are able to leave part of the veins intact while devouring the rest of the tissue.
- Chewed edges or ‘scraped’ areas: In some cases, holes are not the main sign that your plant is infested with green worms, but rather chewed edges or parts of the leaf that look more worn.
- Damaged tender shoots: If the green worm attacks new growth, it can slow down the plant’s development and deform the tips or shoots.
- Dark debris on leaves or substrate. This is one of the most useful and least utilized clues: green worms leave feces on plants, also called frass. We can see them as small dark or greenish granules. When we approach a plant and observe that they are present along with chewed leaves, the presence of green worms on the plants is practically certain.
- Stuck, folded, or finely webbed leaves. Some green worms protect themselves by joining leaves or hiding in small structures that form. If you notice any strange areas, rolled or stuck leaves, you might have green worms in your crop.
- Damage to flowers or buds. In cannabis cultivation, this is the most concerning scenario. When the green worm enters the flower, it not only feeds but also leaves organic debris and wounds that can facilitate the development of fungi.
Green worm, thrips, leaf miner or slugs: How to differentiate them?
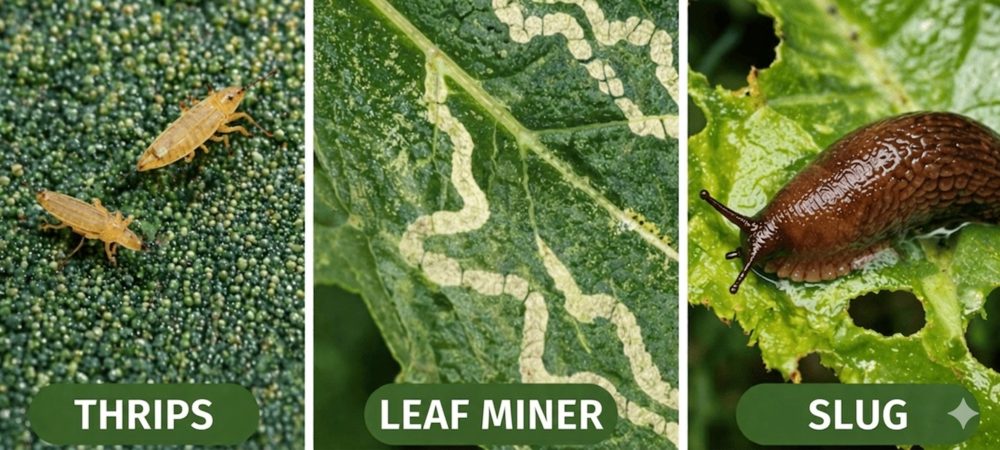
One of the most common mistakes is to see damaged leaves and immediately assume it’s a green worm; this is not always the case. Depending on the state of the leaf, four types can be distinguished:
| Pest | Typical Symptoms |
|---|---|
| Green worm |
|
| Thrips |
|
| Leaf miner |
|
| Slugs |
|
| Tip: correctly identifying the pest is key to applying the appropriate treatment and avoiding further damage to the crop. | |
The initial problem might be the green worm, but it can also worsen. If the plant tissue is wet, dark, or rotting during flowering, it’s not enough to just think about pests; you need to check for fungal infection. In this case, we would be talking about Botrytis. You can discover the step-by-step Botrytis treatment thanks to GB The Green Brand.
What damage can the green worm cause to plants?
To properly assess a green worm infestation, it’s not enough to just look at how much has been eaten; you also need to consider when it happened. Depending on the cultivation phase, the damage caused by the green worm can vary. From a simple loss of leaf surface to compromising much more sensitive parts of the cannabis plant. That’s why it’s important to understand how the risk changes at each stage:
Green worms in seedlings and early stages
In the early stages, even a small green worm attack can be noticeable. The plant does not yet have much plant mass, and any bites from green worms affect a significant part of its ability to continue developing normally. If the green worm feeds on cotyledons, first leaves, or new shoots, it can slow down the start, weaken the initial structure, and even leave a plant unbalanced from the beginning.
Green worms in the growth phase
Likewise, if the presence of green worms on the plants persists, it can also affect their shape. For example, in crops where a balanced structure is sought, this can alter the normal growth rhythm and require correction later with pruning or training.
Green worms in the pre-flowering stage
When the green worm appears in the pre-flowering stage, the problem begins to become more delicate. The entire plant enters an important transition phase, and any stress can be more noticeable. At this time, there is usually more plant mass and more hidden corners. Therefore, it is more difficult to detect the infestation in time, especially if constant checks are not carried out.
If the green worm remains active at this stage, we are no longer just talking about chewed leaves. Green worms can affect shoots, new formation areas, and parts that will be important in the next section of the crop. This is a phase in which it is advisable to act quickly to avoid dragging the problem into flowering.
Green worms in flowering
This is usually the most concerning stage. When the green worm reaches flowering, the damage is no longer just aesthetic or foliar. Green worms will affect much more sensitive areas of the plant. If it starts moving between flowers or buds, it can eat tissue, leave organic debris, and open small wounds that later become a bigger problem.
Furthermore, in dense or less ventilated areas, this debris can favor the appearance of rot. Therefore, a green worm infestation that seemed controllable on leaves can become quite complicated if detected late, when it has already entered closed or delicate parts.
Green worms in buds or flowers
This is the highest risk scenario. Not only because of what the green worm eats, but because of what it leaves behind. When it penetrates compact buds or flowers, it is more difficult to see with the naked eye. In addition, the damage can progress internally before becoming evident externally. At that point, it is no longer enough to locate the green worms. It is necessary to check if it has left deteriorated areas, accumulated debris, or compromised parts that could end up rotting.
In cannabis, this is especially important because a bud that appears healthy on the outside can hide internal damage. If not properly checked, the problem can go unnoticed until the deterioration is already advanced.
How to prevent green worms on plants?
Preventing green worms on plants works best when based on routine rather than improvisation. To ensure that our cannabis crops are not affected by green worms, a series of steps must be followed:
- Check the underside of the leaves: This should be done at least once a week, trying to increase frequency during high-risk periods. This is the simplest way to detect eggs, young larvae, or incipient green worm damage.
- Observe tender shoots and enclosed areas. Many green worms hide in less exposed areas, so you shouldn’t just check the visible part of the plant.
- Improve ventilation and structure. A well-ventilated plant is easier to inspect and offers fewer refuges for green worms.
- Remove clearly damaged leaves or parts. Sanitary pruning helps reduce outbreaks and facilitates monitoring.
- Control the environment. If you grow outdoors, it is advisable to check especially during periods of high insect activity. Plant associations and a more biologically balanced environment also help.
- Don’t wait until half the plant is eaten. The biggest preventive mistake is acting too late. When several leaves are already perforated and visible debris is present, the green worm infestation has been established for some time.
How to eliminate green worms step by step?
Not all cases require the same level of intervention, so it is smartest to act according to the severity. Finding an isolated green caterpillar on a leaf during growth is not the same as detecting several green worms during flowering. Furthermore, in green worm infestations, it is advisable to combine manual inspection, prevention, and specific ingestion products, especially when the problem begins to spread.
If you only see one or a few green worms
When you detect one or two green worms occasionally, the most advisable thing is to start with manual removal. It may seem like a very basic solution, but it is still one of the most useful when the green worm infestation is still small.
If there are affected leaves
When several chewed leaves, irregular holes, or damaged shoots are already visible, it’s not enough to just remove the worm you find. At this stage, it’s advisable to perform a selective cleaning of the very deteriorated parts. This helps with two things: it reduces possible refuges and allows you to see if there are more green worms hidden in the nearby area.
If the infestation is already spreading
When the damage is no longer isolated and several eaten leaves, visible excrement, or new bites start appearing every few days, a more specific treatment is needed. This is where solutions aimed at chewing pests come into play, especially those that act by ingestion.
Among the most effective solutions is the bacterium Bacillus thuringiensis from Trabe. This acts when the worm eats the product sprayed on the leaf, and is especially effective on small green worms.
If the larvae are large or the damage is evident
There’s an important point that many guides don’t explain well: not all worms respond the same way once they’ve grown quite a bit. In stronger infestations or very close to the end of the crop, it may be necessary to resort to more forceful solutions like Decis Protech, an insecticide capable of eliminating worms in a very short time and especially useful when they attack at the end of the crop.
If flowers or buds are affected
This is the scenario that requires the most care. When worms reach flowers or buds, the problem is no longer just what they eat, but what they leave behind. Inspection must be extreme; it’s not enough to kill the worm: you have to check if it has left internal damage.
If an area is clearly compromised, it is usually safer to remove it than to leave a hidden focus advancing inside the flower. Likewise, if there are signs of fungus or rot, after cutting the affected areas and cleaning the area, it is advisable to support the treatment with a specific fungicide such as Fungi Boom.
Bacillus thuringiensis (Bt): when it works and when it doesn’t
One of the areas with the most misinformation is the use of Bacillus thuringiensis var. kurstaki. It’s not magic, but it can be a very useful tool when used correctly.
Bt works by ingestion. The worms consume the treated tissue for the product to act in their gut. That’s why it’s more effective on young specimens, as they are still in early feeding stages. In addition, the insecticide does not produce an instant effect; instead, the worm stops feeding and dies within one to five days.
This implies several things:
- There’s no point expecting an immediate knockdown in minutes.
- If you apply late, with large worms and advanced damage, the result will be worse.
- Coverage matters: if the larva doesn’t ingest enough product, efficacy decreases.
- Its persistence is not very long, so it must be used within a realistic monitoring plan.
Neem, potassium soap, and other treatments: What to expect from each one?
Not all treatments act the same way or are suitable for the same stage of the infestation. When the green caterpillar appears, it is common to think that any pest control product can work. But it is important to know how to use pest control products correctly because each product has a different role within the control strategy.
Some fit better as preventive support, others help reinforce the strategy when the problem begins. In contrast, others are more useful when the worm infestation is already active and a more specific response is needed. Therefore, before choosing, it is important to be clear about what you can really expect from each option:
Neem oil
Neem oil can fit well within a prevention and support strategy, but it should be placed in its real role. It is not the most effective solution when you already have an advanced worm infestation.
Therefore, when facing a worm infestation, neem makes more sense as part of a strategy. In that scenario, expecting neem to solve an active infestation on its own usually leads to poor results or acting too late.
Potassium soap
Potassium soap can be useful as support within general pest management, but it is not the primary tool against established worms. Its role fits better in cleaning strategies, maintenance, or strengthening the plant’s environment. It is especially useful when seeking to improve the coverage of other treatments or maintain the leaf surface more controlled. However, we must be realistic: a caterpillar that is already actively feeding is usually not resolved with potassium soap alone.
That doesn’t mean it has no place. It can be useful as part of a broader routine, or as support in early stages where you are still combining prevention, observation, and manual removal. But if you already see clearly chewed leaves, visible excrement, or damage that keeps appearing every few days, potassium soap falls short as a central response. At that point, the important thing is to move to a more specific strategy for chewing pests and not rely on a solution that is too mild for a problem that has already advanced.
Insecticides for chewing pests
Here, choosing the right type of solution is very important. There are different types of insecticides for cannabis plants, but they are not suitable for the same pests. That is one of the most common mistakes: using a product designed for another type of problem and expecting good results. Caterpillars feed by biting the plant, so the treatment must be specific for caterpillars.
What is interesting is to resort to products aimed at chewing pests, that is, treatments designed to act on insects that eat plant tissue. Here, more specific solutions come into play, especially those that work by ingestion. This point is important because it marks a real difference compared to other support treatments: if the product is designed for the correct type of pest, the strategy gains much more logic and effectiveness.
Therefore, when the infestation is no longer isolated and the damage begins to recur, it is advisable to stop thinking about generic remedies and focus on solutions truly aimed at caterpillars. This choice usually makes the difference between containing the problem in time or prolonging it for several days while the plant continues to suffer damage. The key is not to apply “something”, but to apply the right thing for the type of insect you are dealing with.
Common mistakes when trying to eliminate caterpillars
- Confusing it with another pest. Without a diagnosis, any treatment becomes a gamble.
- Checking only the visible part of the plant. Often the problem is on the underside, in hidden shoots, or in internal areas.
- Waiting too long. The larger the larva grows, the more it eats and the harder it is to control the damage.
- Using Bt expecting immediate effect.
- Not checking flowers or buds. In cannabis, this mistake can be costly due to the risk of secondary botrytis.