Personalized Attention +44 151 947 0713
 SHIPPING TO ALL

 9/10 Rating
 SALE TO MINORS PROHIBITED


With the arrival of autumn and the increase in ambient humidity, the risk of fungi appearing on plants increases considerably, especially in outdoor crops. However, fungal infections are not a problem exclusive to this time of year: they can also appear at any point during cultivation, even in a perfectly equipped indoor grow tent.
Excess humidity, insufficient ventilation, overly frequent watering, waterlogged substrate, or poor hygiene can create the ideal conditions for different fungi to attack our plants. Some mainly affect the roots and seedlings, while others can develop on the leaves or, at the worst possible moment, inside the buds.
The problem is that not all fungi are detected with the naked eye in their early stages. By the time visible symptoms appear, the infection may already be quite advanced.
Therefore, the best strategy is always to combine prevention, frequent inspection, and rapid action.
In this guide, we will look at which fungi are most common in cannabis cultivation, at what stage they usually appear, how to recognize their symptoms, and what to do to reduce the risk of them ruining the harvest.

Why do fungi appear on plants?
Fungi are naturally present in the environment. Their spores can reach the crop through the air, water, substrate, tools, or even through contact with clothing, footwear, and other objects.
Just because a spore reaches a plant does not necessarily mean it will develop. For an infection to progress, favorable conditions usually need to be present.
Among the factors that can increase the risk, we find:
- High ambient humidity for prolonged periods.
- Poor air circulation.
- Plants placed too close together.
- Excess foliage.
- Overly frequent watering.
- Constantly waterlogged substrates.
- Decomposing plant debris.
- Wounds caused by pruning, breakage, or pests.
- Poorly disinfected tools, pots, or growing areas.
- Plants weakened by stress, deficiencies, or root problems.
Prevention should begin even before the seeds germinate. Keeping the growing area clean and controlling environmental conditions is much simpler than trying to stop an advanced infection.
Fungi on plants according to the growth stage
Although some fungi can appear during different stages, there are phases that are especially sensitive.
| Growth stage | Most frequent problems | Main risk factors |
| Germination and seedling | Pythium, Fusarium, and other root problems | Excess water, contaminated substrate, poor oxygenation |
| Growth | Powdery mildew, downy mildew, root problems | Humidity, poor ventilation, excess foliage |
| Flowering | Botrytis, powdery mildew, downy mildew | Dense buds, high humidity, lack of air circulation |
| Drying and curing | Mold and botrytis | Material too damp, poor drying, or incorrect storage |
How to prevent fungi in the germination stage
Germination and the first few weeks of life are one of the most delicate stages. A seedling still has an underdeveloped root system and a very thin stem, so a humidity problem or an infection can quickly finish it off.
Two of the best-known problems during this phase are Pythium and different species of Fusarium.
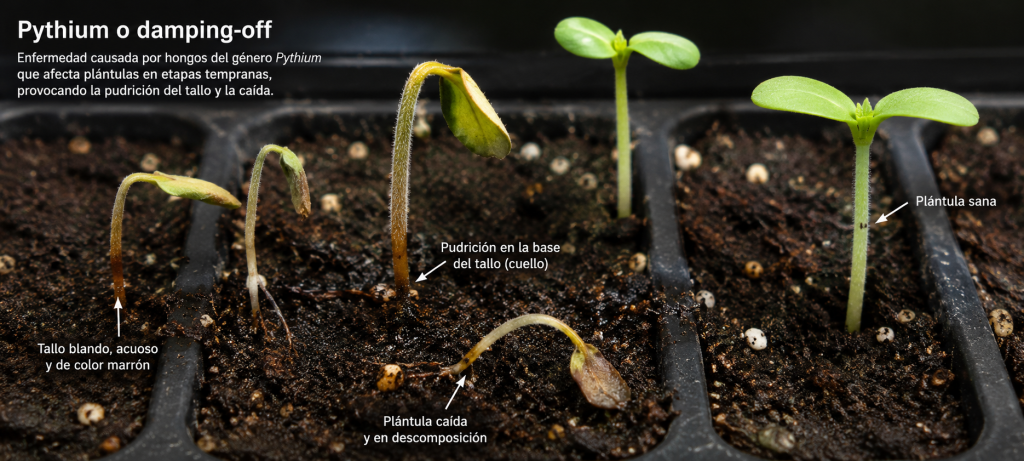
Pythium or damping-off: when the seedling weakens and falls
Pythium is a pathogen mainly associated with problems in the root system and can cause the well-known damping-off.
It can affect seeds before they germinate or attack seedlings shortly after they emerge.
Symptoms may include:
- Seeds that rot before germinating.
- Seedlings that stop growing.
- Darkened or deteriorated roots.
- Narrowing and weakening of the base of the stem.
- Seedlings that bend and end up falling over.
Excess humidity and lack of oxygenation in the substrate are two of the factors that can favor these types of problems.
How to prevent Pythium
To reduce the risk:
- Use seeds of good quality and reliable origin.
- Use a suitable substrate with good drainage.
- Avoid keeping the medium constantly soaked.
- Use clean containers.
- Do not plant seeds at an excessive depth.
- Maintain stable environmental conditions.
- Avoid reusing contaminated substrates.
- Promote the development of a healthy root system.
In this phase, more water does not mean faster growth. A substrate that is too wet for too long can reduce root oxygenation and increase the risk of problems.
Fusarium: a serious problem for roots and the vascular system
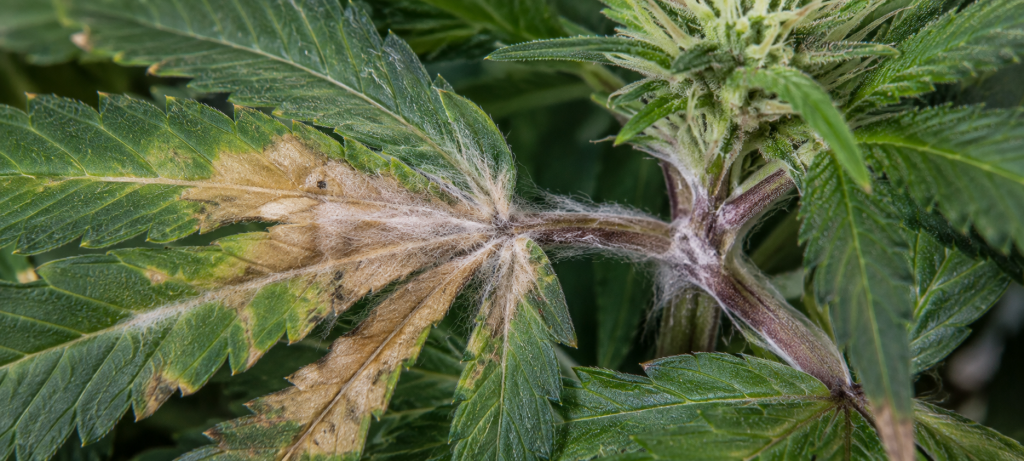
The Fusarium genus includes different species capable of affecting the roots, stem, and vascular system of the plant.
Symptoms can vary depending on the species and the type of infection, but some warning signs are:
- Progressive yellowing.
- Wilting without an apparent cause.
- Roots with dark or necrotic areas.
- Stems with abnormal coloration.
- Branches that wilt in isolation.
- Stunted growth.
- Plants that absorb less water than usual.
In some cases, when observing the inside of the stem, alterations or colorations in the vascular tissues can be seen.
How to act in the event of a possible Fusarium infection
An advanced infection is difficult to reverse. If you suspect that a plant is seriously affected, it is advisable to isolate it from the rest of the crop and avoid reusing the substrate.
Prevention is fundamental:
- Use quality substrates.
- Keep pots and utensils clean.
- Avoid overwatering.
- Do not reuse contaminated growing media.
- Reduce plant stress.
- Promote a balanced rhizosphere using beneficial microorganisms when they are suitable for your cultivation system.
Mycorrhizae and other beneficial microorganisms can be part of a preventive strategy, but they should not be considered an absolute guarantee against an infection.
Fungi in the growth phase
During growth, the plant develops more plant mass and the foliage begins to become denser. If the plants are too close together or ventilation is insufficient, areas can form where air barely circulates.
This is a good phase to establish a prevention routine.
Weekly crop review
A periodic review can help you detect problems before they spread.
Check:
- The top and underside of the leaves.
- The stems and internodes.
- The surface of the substrate.
- The state of the roots if they are visible.
- The interior areas of the plant.
- Dead or damaged leaves.
- The presence of pests that can cause wounds or favor other infections.
Removing dead leaves, improving air circulation, and avoiding moisture accumulation can make a big difference.
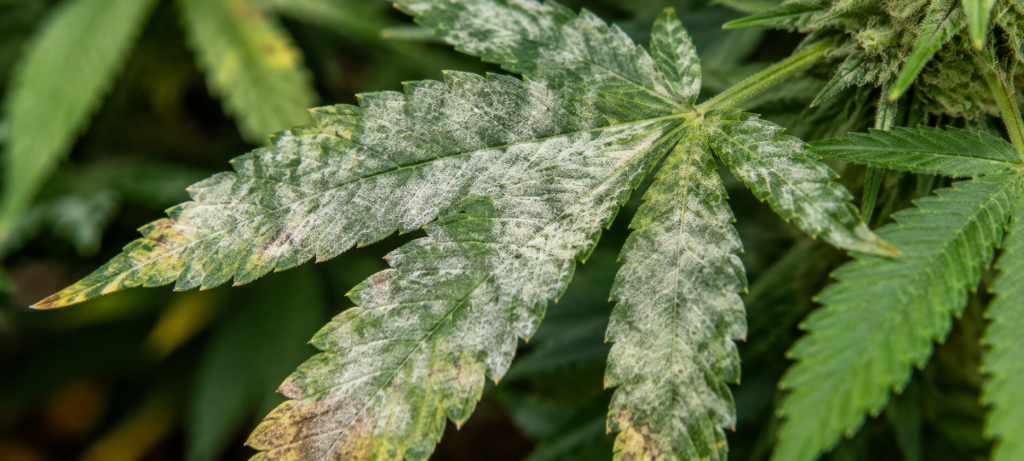
Powdery mildew: the characteristic white dust
Powdery mildew is one of the easiest fungi to recognize visually. It usually starts with small white or grayish spots that resemble dust or flour.
Over time, these spots can spread across:
- Leaves.
- Stems.
- Shoots.
- Flowers in advanced infections.
In addition to the visible spots, the plant may show yellowing, leaf deformation, and a reduction in vigor.
What favors the appearance of powdery mildew?
The risk increases when factors such as the following are combined:
- High humidity.
- Lack of ventilation.
- Plants placed too close together.
- Excess foliage.
- Accumulated plant debris.
- Contaminated tools.
- Weakened plants.
- Frequent environmental changes.
How to prevent powdery mildew
Prevention should focus mainly on the environment:
- Improve ventilation.
- Avoid excessive plant density.
- Do not unnecessarily wet the foliage.
- Remove heavily affected leaves.
- Clean and disinfect tools.
- Check plants frequently.
If symptoms appear, it is advisable to act quickly and isolate the source when possible.
In early stages, preventive products or treatments authorized for cultivation can be used, always following the manufacturer’s instructions and taking into account the plant’s development stage.
Important: during advanced flowering, special care must be taken with any product applied directly to the buds, as it can leave residues and affect the final quality.
Fungi in the flowering phase: the most delicate moment
Flowering is one of the most sensitive stages. As the buds increase in size and density, small internal areas can appear where humidity takes longer to evaporate.
This makes compact flowers an especially vulnerable environment if ambient humidity is high and air circulation is insufficient.
Botrytis: the rot that can start inside the bud
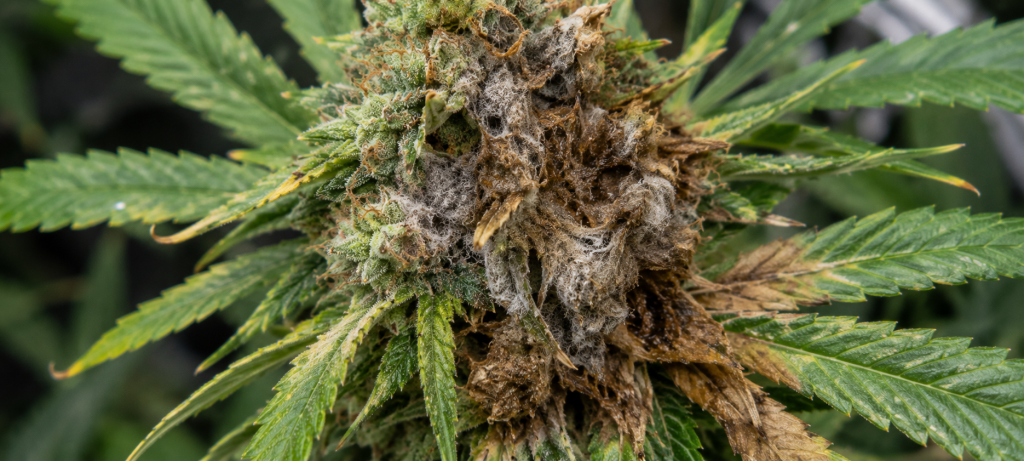
Botrytis, also known as gray mold, is one of the most feared problems during flowering.
It can start inside the bud, so it sometimes goes unnoticed until the infection is already advanced.
Some symptoms are:
- Buds with brown or grayish areas.
- Soft or deteriorated plant tissue.
- Flowers that fall apart easily.
- Cottony or gray appearance.
- Unpleasant or musty odor.
- Small leaves near the bud that dry out suddenly.
Why does botrytis appear?
There are different situations that can increase the risk:
- High humidity.
- Very dense buds.
- Persistent rain or humidity outdoors.
- Lack of ventilation.
- Remains of plant matter trapped in the flowers.
- Wounds caused by pests.
- Damage caused by caterpillars or other insects.
Caterpillars are especially problematic because they can enter the buds, damage the tissues, and leave remains that favor the appearance of infections.
What to do if you find botrytis
If you detect a clearly affected bud:
- Avoid handling it roughly so as not to disperse contaminated material.
- Isolate the affected area.
- Carefully remove the bud or the affected part of the plant.
- Disinfect the tools used before working with healthy plants again.
- Check nearby buds.
- Immediately improve ventilation and humidity conditions.
It is not recommended to try to recover a bud with visible mold for consumption. Removing only the surface part does not guarantee that there are no fungal structures in other areas of the flower.
Downy mildew: spots and fuzz on the leaves
Although it usually receives less attention than powdery mildew or botrytis, downy mildew can also affect the crop.
Depending on the responsible organism and the evolution of the infection, the following may appear:
- Yellow or yellowish spots on the top of the leaves.
- Brown or necrotic areas.
- A kind of fuzz on the underside.
- Progressive loss of vigor.
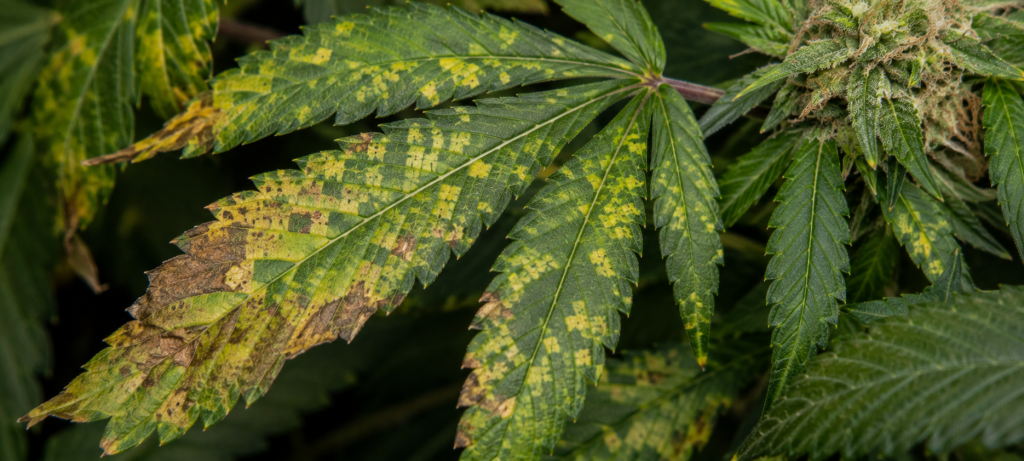
Early detection is important because the spots can be confused with nutritional deficiencies, burns, or damage caused by pests.
How to differentiate fungi from other spots?
Not all spots or discolorations indicate a fungal infection.
A nutritional deficiency, a pest, a light burn, or an excess of fertilizer can also produce visual symptoms.
A simple way to get oriented is to observe the pattern:
| Symptom | Possible problem |
| White dust on the surface | Powdery mildew |
| Brown or gray bud from the inside | Botrytis or mold |
| Yellow spots and fuzz on the underside | Downy mildew |
| Orange or brown pustules | Rust |
| Narrowed and fallen seedling | Damping-off or root problem |
| Dark and deteriorated roots | Possible infection or root suffocation |
This table does not replace a professional diagnosis, but it can help you decide when to check the plant more closely.
How to prevent fungi on plants throughout the entire crop
The best way to fight fungi is to reduce the conditions that favor their development.
1. Control humidity
Avoid maintaining excessive humidity for prolonged periods, especially when the buds are already formed.
If you grow indoors, use measuring instruments to truly know the conditions of the growing area instead of relying solely on feelings.
2. Maintain good air circulation
Air should circulate around the plants, but without causing damage from an excessively strong direct draft.
Pay special attention to:
- The interior of the plant.
- The areas between pots.
- The densest buds.
- The corners of the grow tent or room.
3. Do not overwater
A constantly saturated substrate can harm the roots and create a favorable environment for different pathogens.
Adjust the watering frequency to the size of the plant, the volume of the pot, the type of substrate, and the environmental conditions.
4. Keep the growing space clean
Regularly remove:
- Dead leaves.
- Plant debris.
- Spilled substrate.
- Severely affected plants.
It is also advisable to clean and disinfect tools before using them on different plants.
5. Watch for pests
Many pests cause wounds that can become a gateway for different pathogens.
Frequent checks allow you to detect caterpillars, thrips, aphids, and other insects before the problem advances.
6. Avoid working with sick and healthy plants without hygiene
If you have handled an affected plant, clean your hands and tools before touching another.
This small habit can help reduce the spread of problems within the crop.
What to do if a fungus appears on a plant?
Speed is essential.
If you detect a possible infection:
1. Identify the problem.
Observe whether it is in the roots, leaves, stems, or buds.
2. Isolate the plant if possible.
This reduces contact with the rest of the crop.
3. Remove clearly affected material when appropriate.
Use clean tools and avoid unnecessary handling of infected areas.
4. Check environmental conditions.
Check humidity, ventilation, temperature, and watering frequency.
5. Look for the cause of the problem.
A treatment will be less effective if the conditions that favored the infection continue.
6. Use only products suitable for the growth phase.
Always respect the manufacturer’s instructions, dosages, and recommendations for use.
Can fungi appear after harvest?
Yes. Harvesting does not eliminate the risk.
Drying too slowly, excessive humidity, or incorrect storage can favor the appearance of mold on the buds.
Therefore, during drying and curing, it is also important to check the flowers regularly.
If you detect:
- Fuzz.
- Filaments.
- Irregular spots.
- Musty or rotten odor.
- Soft or deteriorated areas.
It is advisable to immediately separate the suspicious material and avoid mixing it with healthy flowers.